For nails, I found sites exposing two main approaches, very close to those on polymer: transfer directly on dry polish on the nails using rubbing alcohol as a transfer agent, and home made decals by applying polish to a print on normal paper, and then carefully rubbing of the paper, leaving the print on the polish (very similarly to what is done on polymer, and with the same drawbacks; it is not easy to rub of the paper and not the print).
Some also use special papers of various kinds like printable decal paper, but I am more interested with what can be done with non-specific material easily available at home.
I had been very lucky with transfers on polymer, because I stumbled very early on a foolproof technique: laserjet printing on parchment/baking paper (I first saw the idea on GlassAttic, and it was proposed by Valerie Aharoni, but her website is now down). If your printer is not wrecked by the paper (you do this at your own risk !), and it comes out without being smudged, perfect and complete transfer is assured, because the parchment paper will not attach to the ink or the clay like regular paper does). Parchment paper is already used in nail art to create pure polish decals with drawings / or stamps easier than directly on nails (a search with stamping decal technique brings up very nice examples and tutorials).
The print:
So, the first step is printing on parchment paper (do at your laserjet's risk). Expect to rescue paper from inside the printer multiple times.
Print each pattern in several sizes, so you can choose which one fits your nails best.
You can use parts of the picture, or the whole picture for the transfer. Size accordingly, and you might as well fill the page for printing, but leave some space around each picture. You might destroy some in the process, so repeat the pictures multiple times (here from Wikimedia Commons, plant diagrams provided by Mark A. Hicks and Pearson Scott Foresman). A picture 1cm*1.5cm covers the whole nail (depending of course on your nail size), so you have room for many in a single A4 page.
The resulting print is fragile, and does not stand rubbing. If you have to keep it for a while (I first tried with one year old prints, so they keep well), keep in a folder where it will not slide around.
Preparing the decal:
Protect the print you want to work witth with a layer of transparent polish or top coat (like you would with liquid clay for polymer clay). Drop one larger polish drop in the middle of the picture, and pull it with the polish brush to cover the whole drawing without touching the paper and print (black arrows). The polish is no problem, rubbing will damage the print.
It might be better not to cover with polish pictures you will not use within a few days, I do not know how the polish behaves on the long term.
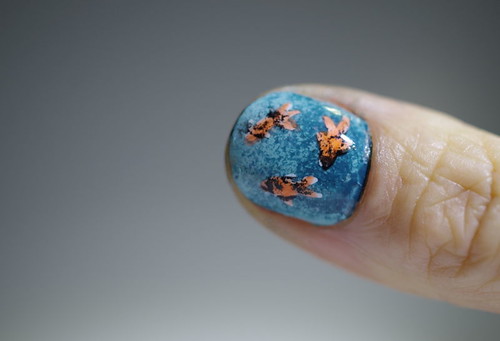
You might need to layer several coats depending on the base color you intend to place the decals on. For the little goldfish (again, Wikimedia Common, from a Japanese book from the beginning of the 20th century), I used two layers of red and one of white on top (I used the smallest prints, on the right).
Wait overnight. Seriously. They will be much stronger and easier to manipulate.
Cut around the area you are interested in, and peel the decal from the parchment paper. The print will detach with it.
Placing the decal on the nails:
Put a layer of topcoat on one nail. Wait a few seconds, and place the decal on it, print side up. Try to avoid trapping air under the decal.
Shape the decal around your nail. It is made of polish, pretty thin, and in contact with fresh topcoat. It will shape perfectly, but is easy to deform or tear at this step. You can place torn parts back in place like I did here.
The goldfish here received a single layer of topcoat.
A few tips:
- Resolution is important. Pixels are very visible at this scale (although less if you color the print afterwards). You can test pictures by printing them on normal paper first and examining them closely. Mine were pretty rough. Some of this depends on the picture, some on the printer's resolution and settings.
- If the base layer of transparent polish is very thin, you can put a second layer to make a stronger decal before removing from the parchment paper. I succeeded with both one layer and two layer decals. Thicker is stronger, but thinneris easier to blend once on the nail.
- The decal is made of polish. the nails can be cleaned like with a normal polish layer.
-Letting the decals dry properly (overnight or more) really helps. This is a great way to prepare the heavy work in advance, and just place it on the nails when needed.
So not that much new here, but this is an easy and fast way to create nail art from any picture you want, for the more drawing challenged among us.
Hope you will have fun !
Aucun commentaire:
Enregistrer un commentaire