 |
| Bamboo texture from a steam cooking basket |
I have a collection of natural textures collected over the years, and most are wonderful on polymer. So I wondered how I could use them in the technique transfer exercise, and here is the results after a few tries.
The approach relies on self made molds of silicone (the type you mix out of two components). They are easy to use, have a very high resolution, and most importantly the nail polish does not adhere to them (at least to my brand of silicone, make a test on yours before ruining a precious mold).
If you are interested, here is a tutorial of how to reproduce the effect.
If you don't have a mold already, first get your hands on some two component silicone. I used this.
If you never used it before, read the package instructions, but it is pretty straightforward (see the blog of Ginger Allman Davis for a very detailed tutorial on creating molds with this material).
The silicone molding components generally do not adhere to or damage most materials, including fabrics, lace, etc. They do however adhere to some silicones, and some materials prevent it from correct polymerisation. However be careful if your model is precious to you and make a small test in an inconspicuous area.
Choose a surface with a nice, fine pattern. It will have to fit and be nice on nails, but you need to make a mold that is slightly larger: 2.5 cm*3 cm should be enough, except if you have very large nails, but measure them if you are unsure.
Work on a flat, clean area (a tile or a sheet of paper for instance). Lay down your model, mix the molding components and place on the object to mold, taking care not to trap air anywhere between the silicone and the object. You have 2 to 5 minutes at most to work before the polymerisation is too advanced. Placing a second flat object on top allows to make a mold with a flat bottom, which is easier to use.
Leave alone for 10 minutes at least if the temperature is above 20°C. Be careful that lower temperatures make polymerisation time longer.
Like for the transfer technique, you need to prepare the texture "decals" the day before (or several days in advance) to let the polish dry thoroughly. You can prepare several in advance to use when you want. However, I don't know how long the dried polish keeps its properties.
Mold choice
0,5, 1, or at most 2mm deep. Too high structures might catch in clothing when worn or break of. The texture will be hard to put in place on the nail and the mold will take many layers of polish to fill. Avoid overhangs, as they might break off or be hard to remove from the mold.
 |
| Fish scales |
Color choice
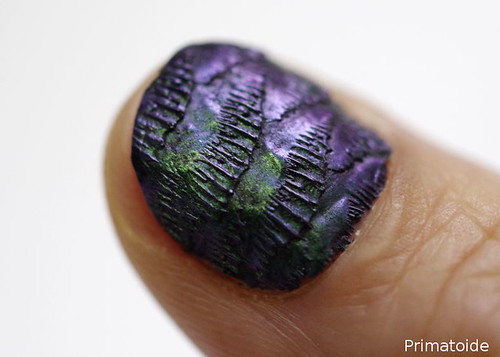
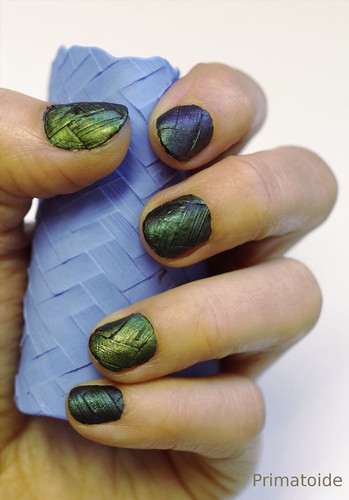
You can use a single color. You can introduce several, in a pattern reflecting the texture, or layered, to accentuate the shadows and the texture (much like Sutton slice in polymer). A combination I like very much is one layer of multichrome and then black. The lighter multichromes worked better, as the contrast is higher with the black underlayers. For ILNP, for instance, Nostalgia and Mutagen worked much better than Sirene, which ends up much darker (both the thumb and the index closups are Sirene), although it can be very nice under some lightings.
The texture decal
 |
| Lace texture |
 |
| Filigree texture from an earring |
 When this first color is dry, start adding the other layers one by one, building contrast if you want. As before, let the polish pool in the lower areas to fill them. I had good success with three layers for shallow molds, but very deep molds like the lace needed five. You are aiming for two layers on the areas where there is the thinnest polish, and a back relatively flat.
Leave to dry overnight, add polish if necessary in the morning, as the layers will have contracted and might not fill the holes anymore.
Once you are satisfied with the solidity, get the decal out very carefully.
Putting the decal on
Prepare your nail with the same color you used as the top color, and topcoat it. Let dry well. With this unifying color, any small hole or missing piece will be close to invisible.
Precut the decal to a slightly larger size than the nail.
Putting it on is similar to the print decal approach: a layer of topcoat will serve as a bond between the texture and the polish layers on the nail. Prepare a single nail at a time. Cover the nail well, but not thickly with a fast drying topcoat. Apply the decal and press it on carefully.
The topcoat will dry slowly more slowly under the decal, so be careful when putting it on and positioning it. Especially after a few seconds, when the decal is softened, the details can easily be squished. Press all around with a toothpick to ensure contact on the sides. Once the topcoat dry, cut the decal to size using very fine scissors.
A few tips:
- Use quality polish. Topcoat would flatten the design and hide the volume, so the upper layer (the one in contact with the mold) has to stand wear. The only brands I have tried are ILNP (because I love multichrome on volumes) and a Color Club magnetic I had around, but other brands should work too. I have however used cheaper brands to build up the volume.
 - Playing with molds is wonderful. But there are frustrating situations: the texture is gorgeous -if you look at it with a magnifier. Not deep enough for mokume gane, too small for most uses... They can be used for this, and their fine grain will be perfect for this application.
- If you have molds out of other materials (polymer clay, latex, or other), copy them with two component silicone, so you have a mold with the right properties. I wouldn't encourage copying commercial molds or designs, though.
- Textured nail art stands wear pretty well (over 5 days). The first time, I was very rough with them, so much that I had to touch up the normally lacquered nails; but it was not needed on the textured nails. The thickness of the polish layers makes them strong if they are attached over their whole surface.
- If you wear them several days, the upper ridges will get worn, and shiny, maybe show the layers below. This can look better than the "new" nail art.
Of course, you can also create textures with clay and mold them with silicone, keeping in mind the size and depth restriction.
1 commentaire:
Covid-19 has a tough year ever but with the help of Mr Pedro loan offer I was able to get through because his loan offer of 2% really helped me alot and I 'm grateful to share on here that Mr Pedro offer loans at 2% rate also he can fund any type of legitimate business or seeking for personal financial assistance. Email: pedroloanss@gmail.com And Whats-App: +1- 8632310632
Enregistrer un commentaire